HELK安装
首先进行项目下载
git clone https://github.com/Cyb3rWard0g/HELK.git
进入docker目录,然后运行helk_install.sh
cd HELK/docker
sudo ./helk_install.sh
然后界面显示安装的选项有如下4种,我们选择第二种
Option 1: 5GB includes KAFKA + KSQL + ELK + NGNIX.
Option 2: 5GB includes KAFKA + KSQL + ELK + NGNIX + ELASTALERT
Option 3: 7GB includes KAFKA + KSQL + ELK + NGNIX + SPARK + JUPYTER.
Option 4: 8GB includes KAFKA + KSQL + ELK + NGNIX + SPARK + JUPYTER + ELASTALERT.
安装完成后的结果如下
***********************************************************************************
** [HELK-INSTALLATION-INFO] HELK WAS INSTALLED SUCCESSFULLY                      **
** [HELK-INSTALLATION-INFO] USE THE FOLLOWING SETTINGS TO INTERACT WITH THE HELK **
***********************************************************************************

HELK KIBANA URL: https://192.168.1.100
HELK KIBANA USER: helk
HELK KIBANA PASSWORD: hunting
HELK ZOOKEEPER: 192.168.1.100:2181
HELK KSQL SERVER: 192.168.1.100:8088

IT IS HUNTING SEASON!!!!!

You can stop all the HELK docker containers by running the following command:
 [+] sudo docker-compose -f helk-kibana-analysis-alert-basic.yml stop
若安装过程中出现任何错误,可以查看日志
tail -f /var/log/helk-install.log
ps:Docker使用socks5代理
安装过程中docker下载镜像很慢,可以使用代理解决,方法如下
- 创建docker服务插件目录
sudo mkdir -p /etc/systemd/system/docker.service.d - 创建一个名为http-proxy.conf的文件
sudo touch /etc/systemd/system/docker.service.d/http-proxy.conf - 编辑http-proxy.conf的文件
sudo vim /etc/systemd/system/docker.service.d/http-proxy.conf - 写入内容(将代理ip和代理端口修改成你自己的)
[Service] Environment="HTTP_PROXY=socks5://代理ip:代理端口/" - 重新加载服务程序的配置文件
sudo systemctl daemon-reload - 重启docker
sudo systemctl restart docker - 验证是否配置成功
systemctl show --property=Environment docker
安装完成
此时查看docker
CONTAINER ID        IMAGE                                                 COMMAND                  CREATED             STATUS              PORTS                                                                              NAMES
2caa7d86bc9e        confluentinc/cp-ksql-cli:5.1.3                        "/bin/sh"                5 minutes ago       Up 5 minutes                                                                                           helk-ksql-cli
1ee3c0d90b2a        confluentinc/cp-ksql-server:5.1.3                     "/etc/confluent/dock…"   5 minutes ago       Up 5 minutes        0.0.0.0:8088->8088/tcp                                                             helk-ksql-server
e753a811ffd2        otrf/helk-kafka-broker:2.4.0                          "./kafka-entrypoint.…"   5 minutes ago       Up 5 minutes        0.0.0.0:9092->9092/tcp                                                             helk-kafka-broker
f93239de7d95        otrf/helk-zookeeper:2.4.0                             "./zookeeper-entrypo…"   5 minutes ago       Up 5 minutes        2181/tcp, 2888/tcp, 3888/tcp                                                       helk-zookeeper
229ea8467075        otrf/helk-elastalert:0.3.0                            "./elastalert-entryp…"   5 minutes ago       Up 5 minutes                                                                                           helk-elastalert
f6fd290d2a9d        otrf/helk-nginx:0.3.0                                 "/opt/helk/scripts/n…"   5 minutes ago       Up 5 minutes        0.0.0.0:80->80/tcp, 0.0.0.0:443->443/tcp                                           helk-nginx
d4f2b6d7d21e        otrf/helk-logstash:7.6.2                              "/usr/share/logstash…"   5 minutes ago       Up 5 minutes        0.0.0.0:3515->3515/tcp, 0.0.0.0:5044->5044/tcp, 0.0.0.0:8531->8531/tcp, 9600/tcp   helk-logstash
c5ae143741ea        docker.elastic.co/kibana/kibana:7.6.2                 "/usr/share/kibana/s…"   5 minutes ago       Up 5 minutes        5601/tcp                                                                           helk-kibana
1729e3234b91        docker.elastic.co/elasticsearch/elasticsearch:7.6.2   "/usr/share/elastics…"   5 minutes ago       Up 5 minutes        9200/tcp, 9300/tcp                                                                 helk-elasticsearch
sysmon 配置文件
安装完成helk之后,我们来生成sysmon配置文件,项目地址如下
https://github.com/olafhartong/sysmon-modular
在powershell中运行如下命令
$> git clone https://github.com/olafhartong/sysmon-modular.git
$> cd sysmon modular
$> . .\Merge-SysmonXml.ps1
$> Merge-AllSysmonXml -Path ( Get-ChildItem '[0-9]*\*.xml') -AsString | Out-File sysmonconfig.xml
然后我们就得到了一个新的sysmonconfig.xml文件
然后我们将sysmon64.exe拷贝到sysmon-modular文件夹中,运行如下命令启动
sysmon.exe -accepteula -i sysmonconfig.xml
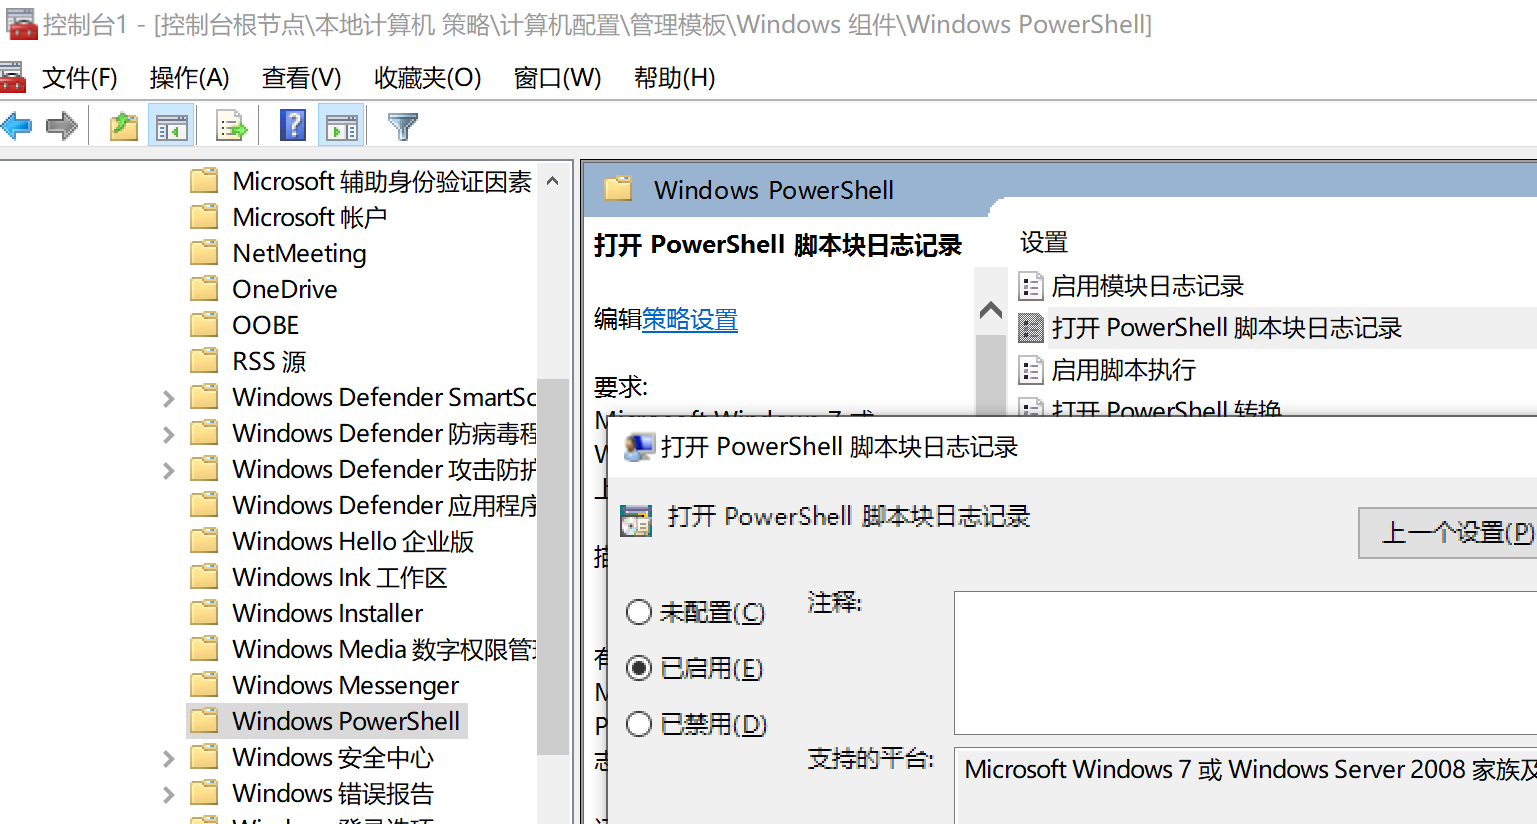
命令行log和powershelllog在如下位置配置
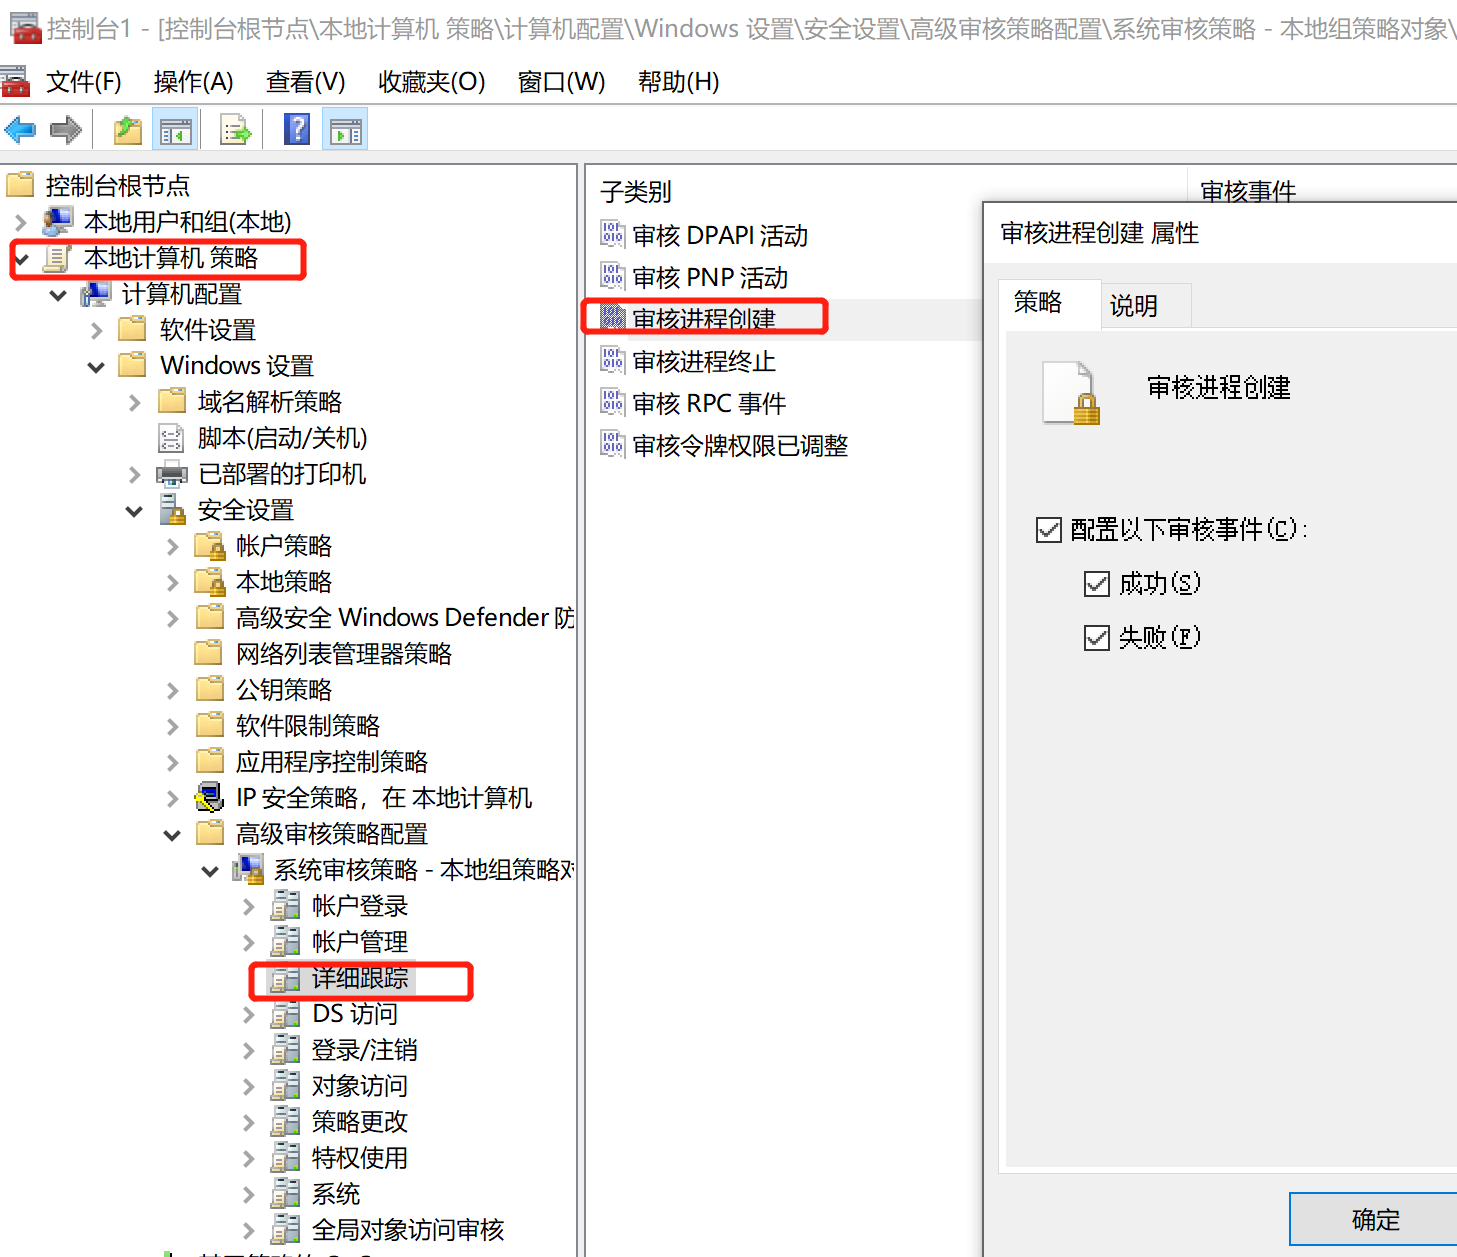
另一处配置如下
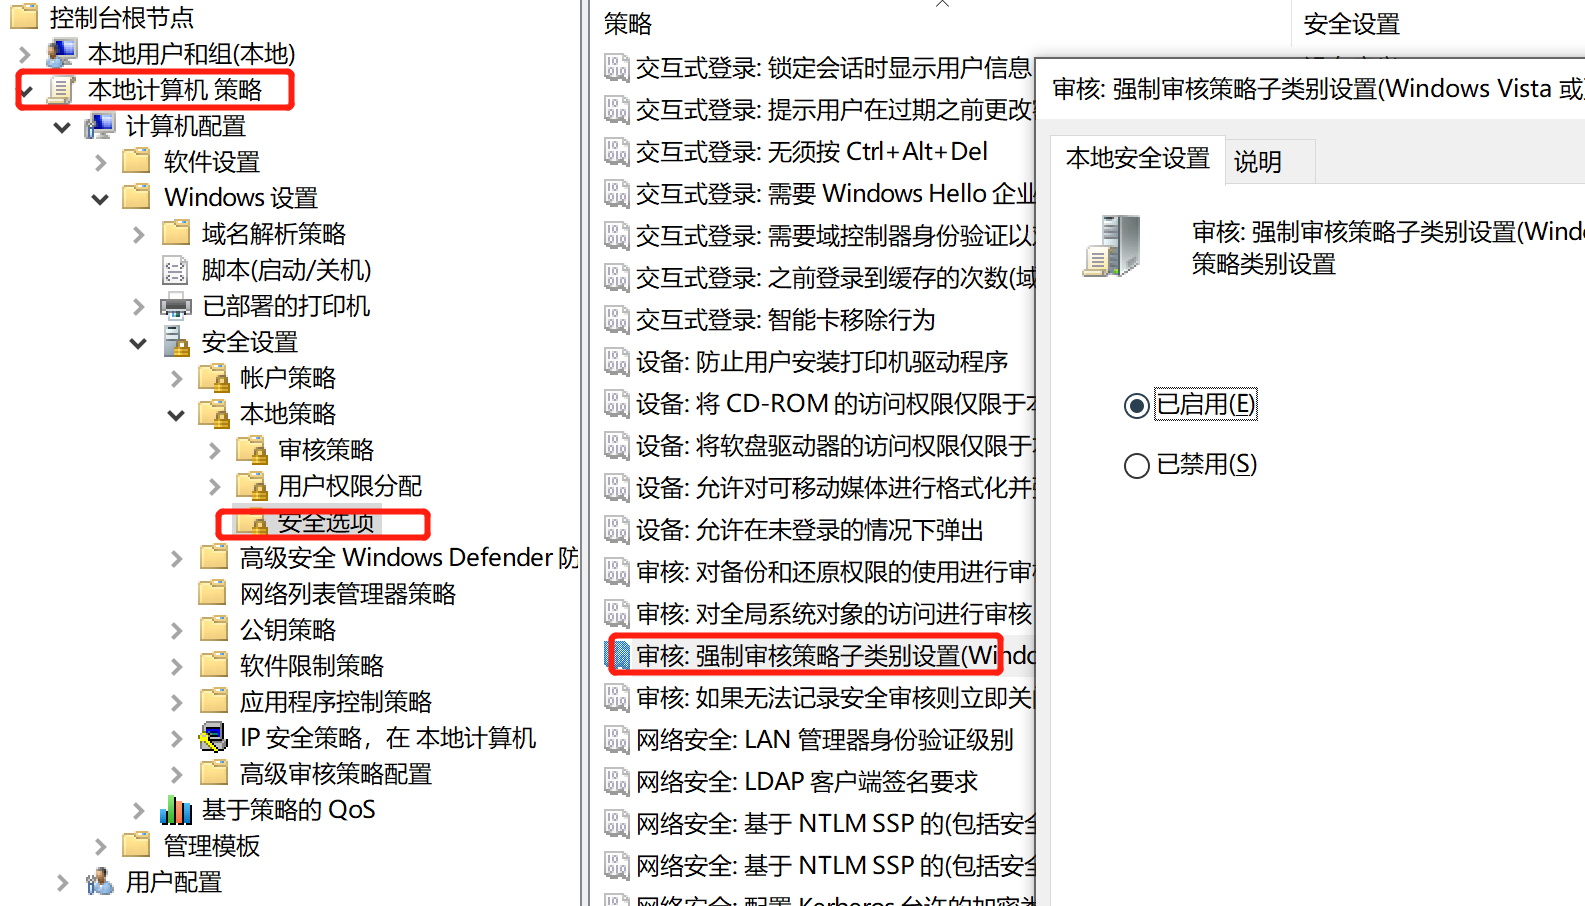
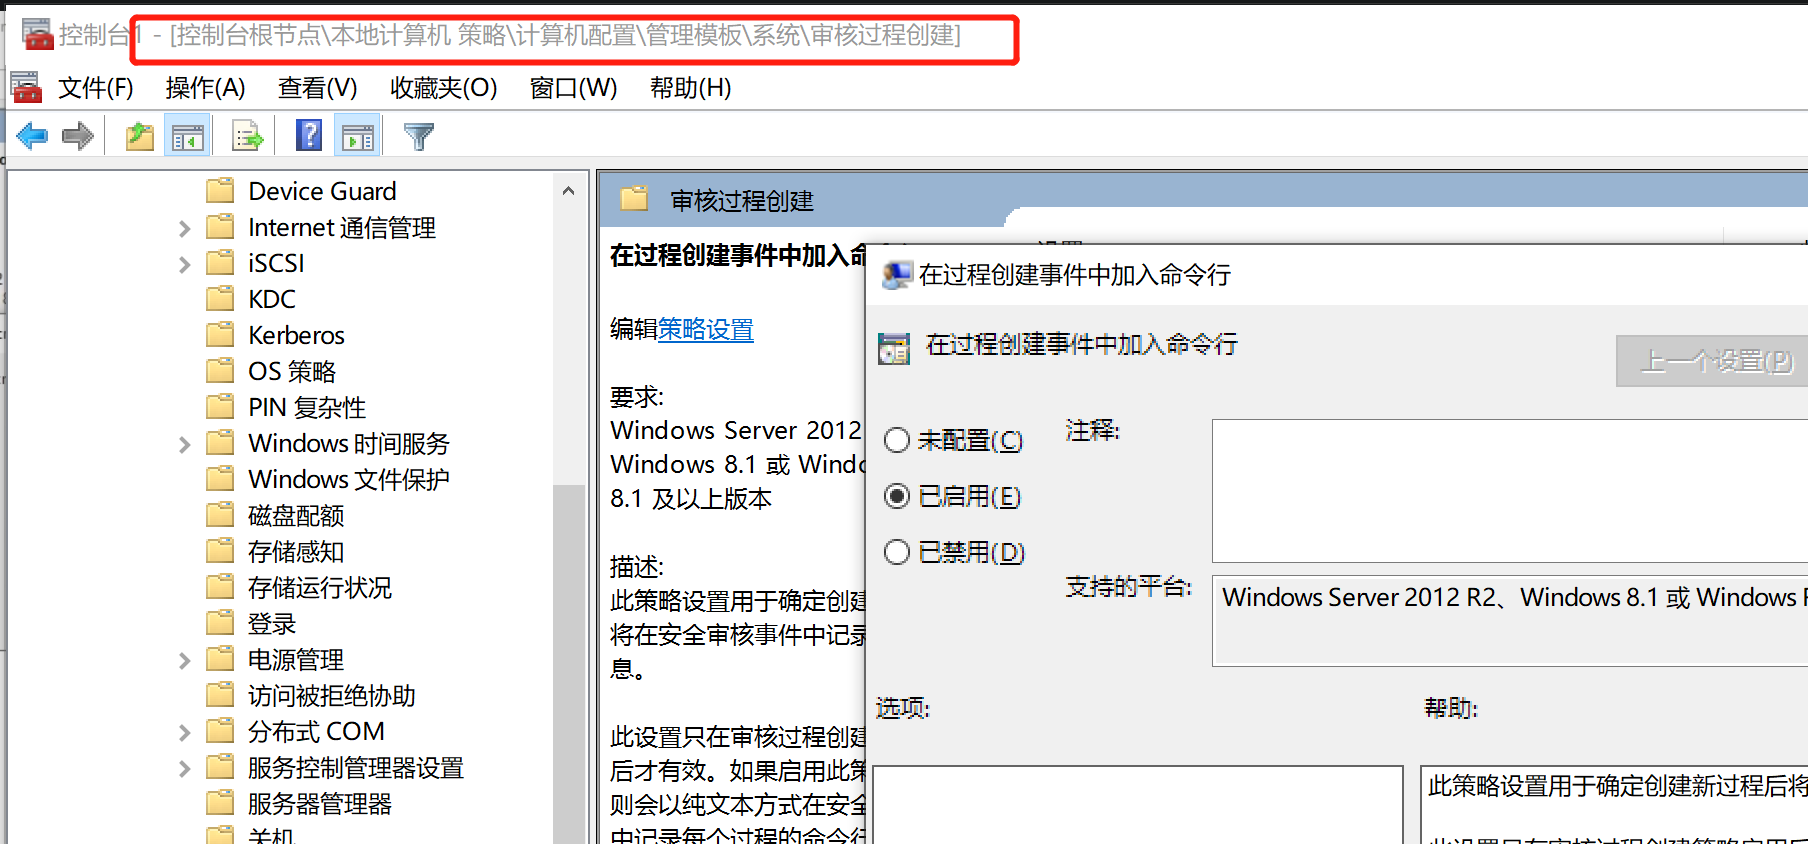
开启cmd记录
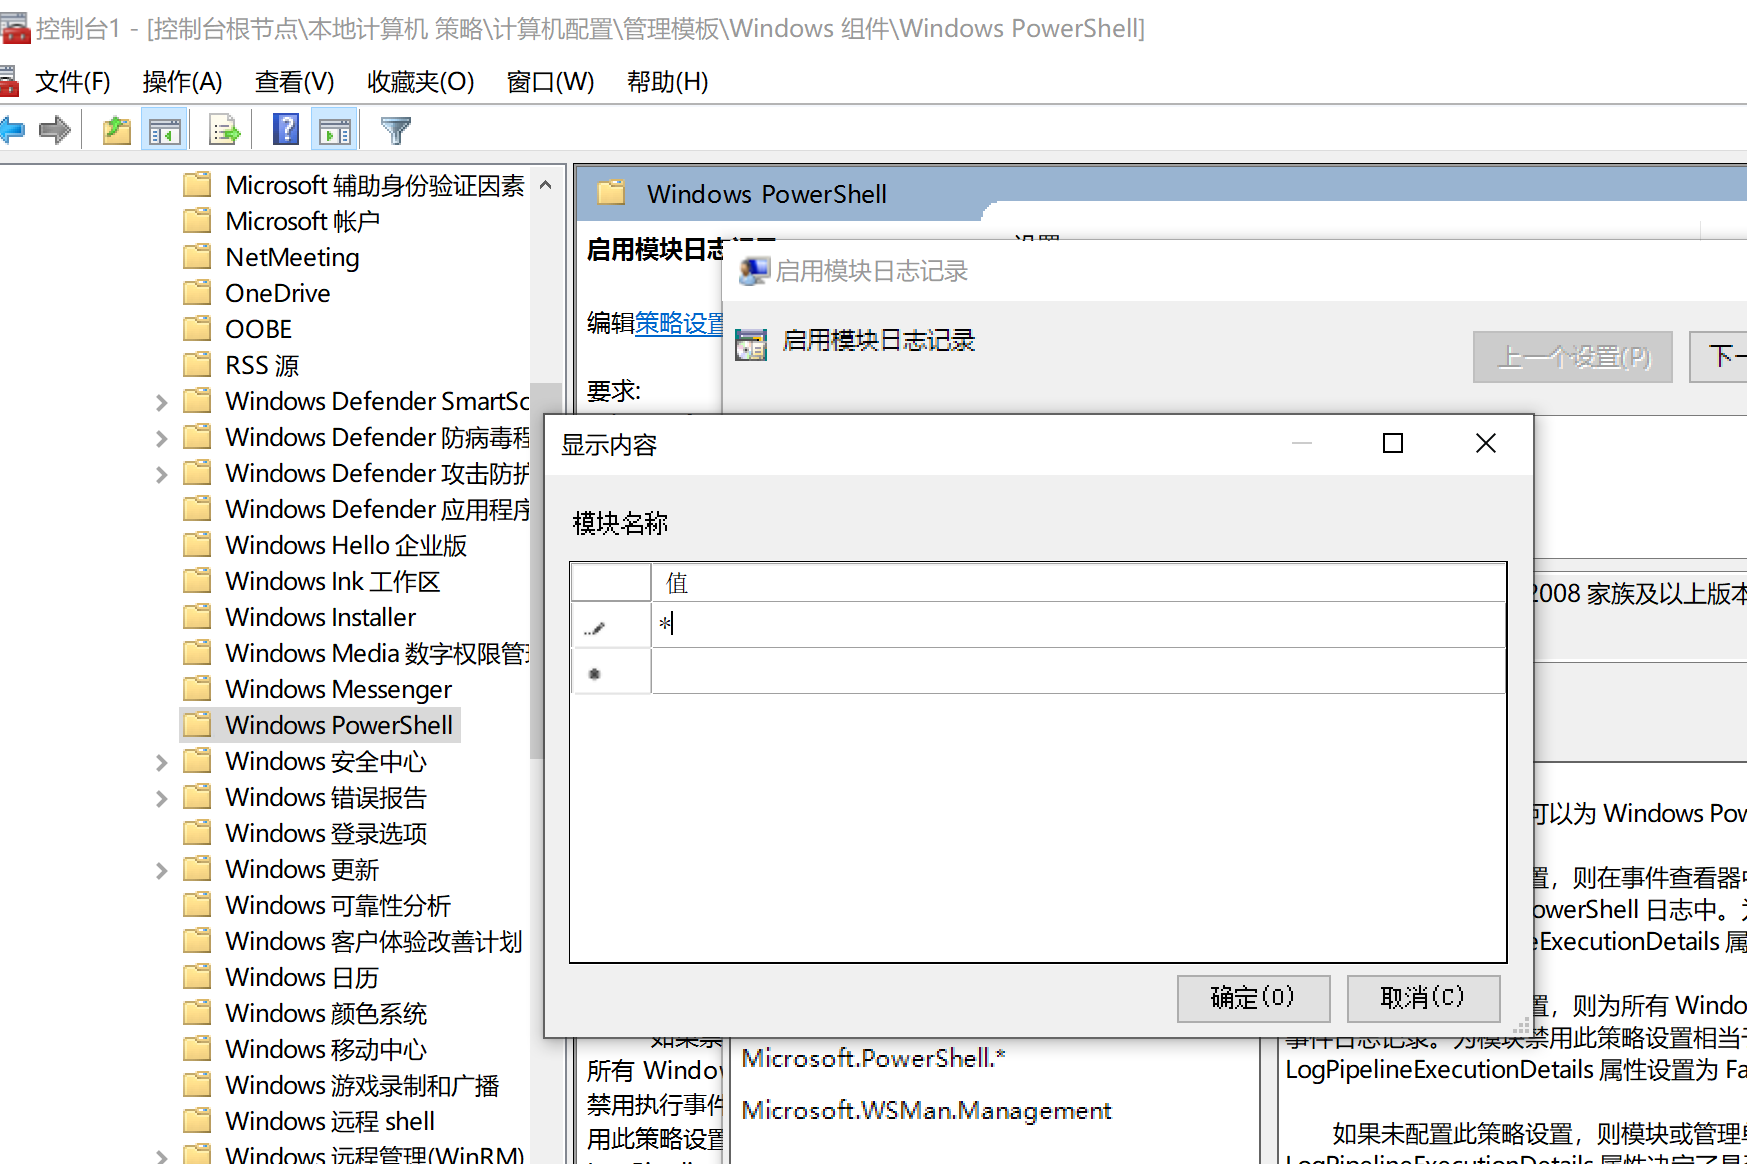
开启powershell记录
winlogbeat安装
下载地址
https://www.elastic.co/cn/downloads/beats/winlogbeat
相关配置可在https://github.com/Cyb3rWard0g/HELK/blob/master/configs/winlogbeat/winlogbeat.yml找到
###################### Winlogbeat Configuration Example #########################
# Winlogbeat 6, 7, and 8 are currently supported!
# You can download the latest stable version of winlogbeat here:
# https://www.elastic.co/downloads/beats/winlogbeat

# For simplicity/brevity we have only enabled the options necessary for sending windows logs to HELK.
# Please visit the Elastic documentation for the complete details of each option and full reference config:
# https://www.elastic.co/guide/en/beats/winlogbeat/current/winlogbeat-reference-yml.html

#-------------------------- Windows Logs To Collect -----------------------------
winlogbeat.event_logs:
  - name: Application
    ignore_older: 30m
  - name: Security
    ignore_older: 30m
  - name: System
    ignore_older: 30m
  - name: Microsoft-windows-sysmon/operational
    ignore_older: 30m
  - name: Microsoft-windows-PowerShell/Operational
    ignore_older: 30m
    event_id: 4103, 4104
  - name: Windows PowerShell
    event_id: 400,600
    ignore_older: 30m
  - name: Microsoft-Windows-WMI-Activity/Operational
    event_id: 5857,5858,5859,5860,5861

#----------------------------- Kafka output --------------------------------
output.kafka:
  # initial brokers for reading cluster metadata
  # Place your HELK IP(s) here (keep the port).
  # If you only have one Kafka instance (default for HELK) then remove the 2nd IP that has port 9093
  hosts: ["<HELK-IP>:9092","<HELK-IP>:9093"]
  topic: "winlogbeat"
  ############################# HELK Optimizing Latency ######################
  max_retries: 2
  max_message_bytes: 1000000
然后更改ip如下
...
...
#----------------------------- Kafka output --------------------------------
output.kafka:
  # initial brokers for reading cluster metadata
  # Place your HELK IP(s) here (keep the port).
  # If you only have one Kafka instance (default for HELK) then remove the 2nd IP that has port 9093
  hosts: ["192.168.1.100:9092"]
  topic: "winlogbeat"
...
...
在powershell中运行
.\install-service-winlogbeat.ps1
然后在服务中运行winlogbeat
至此安装全部完成
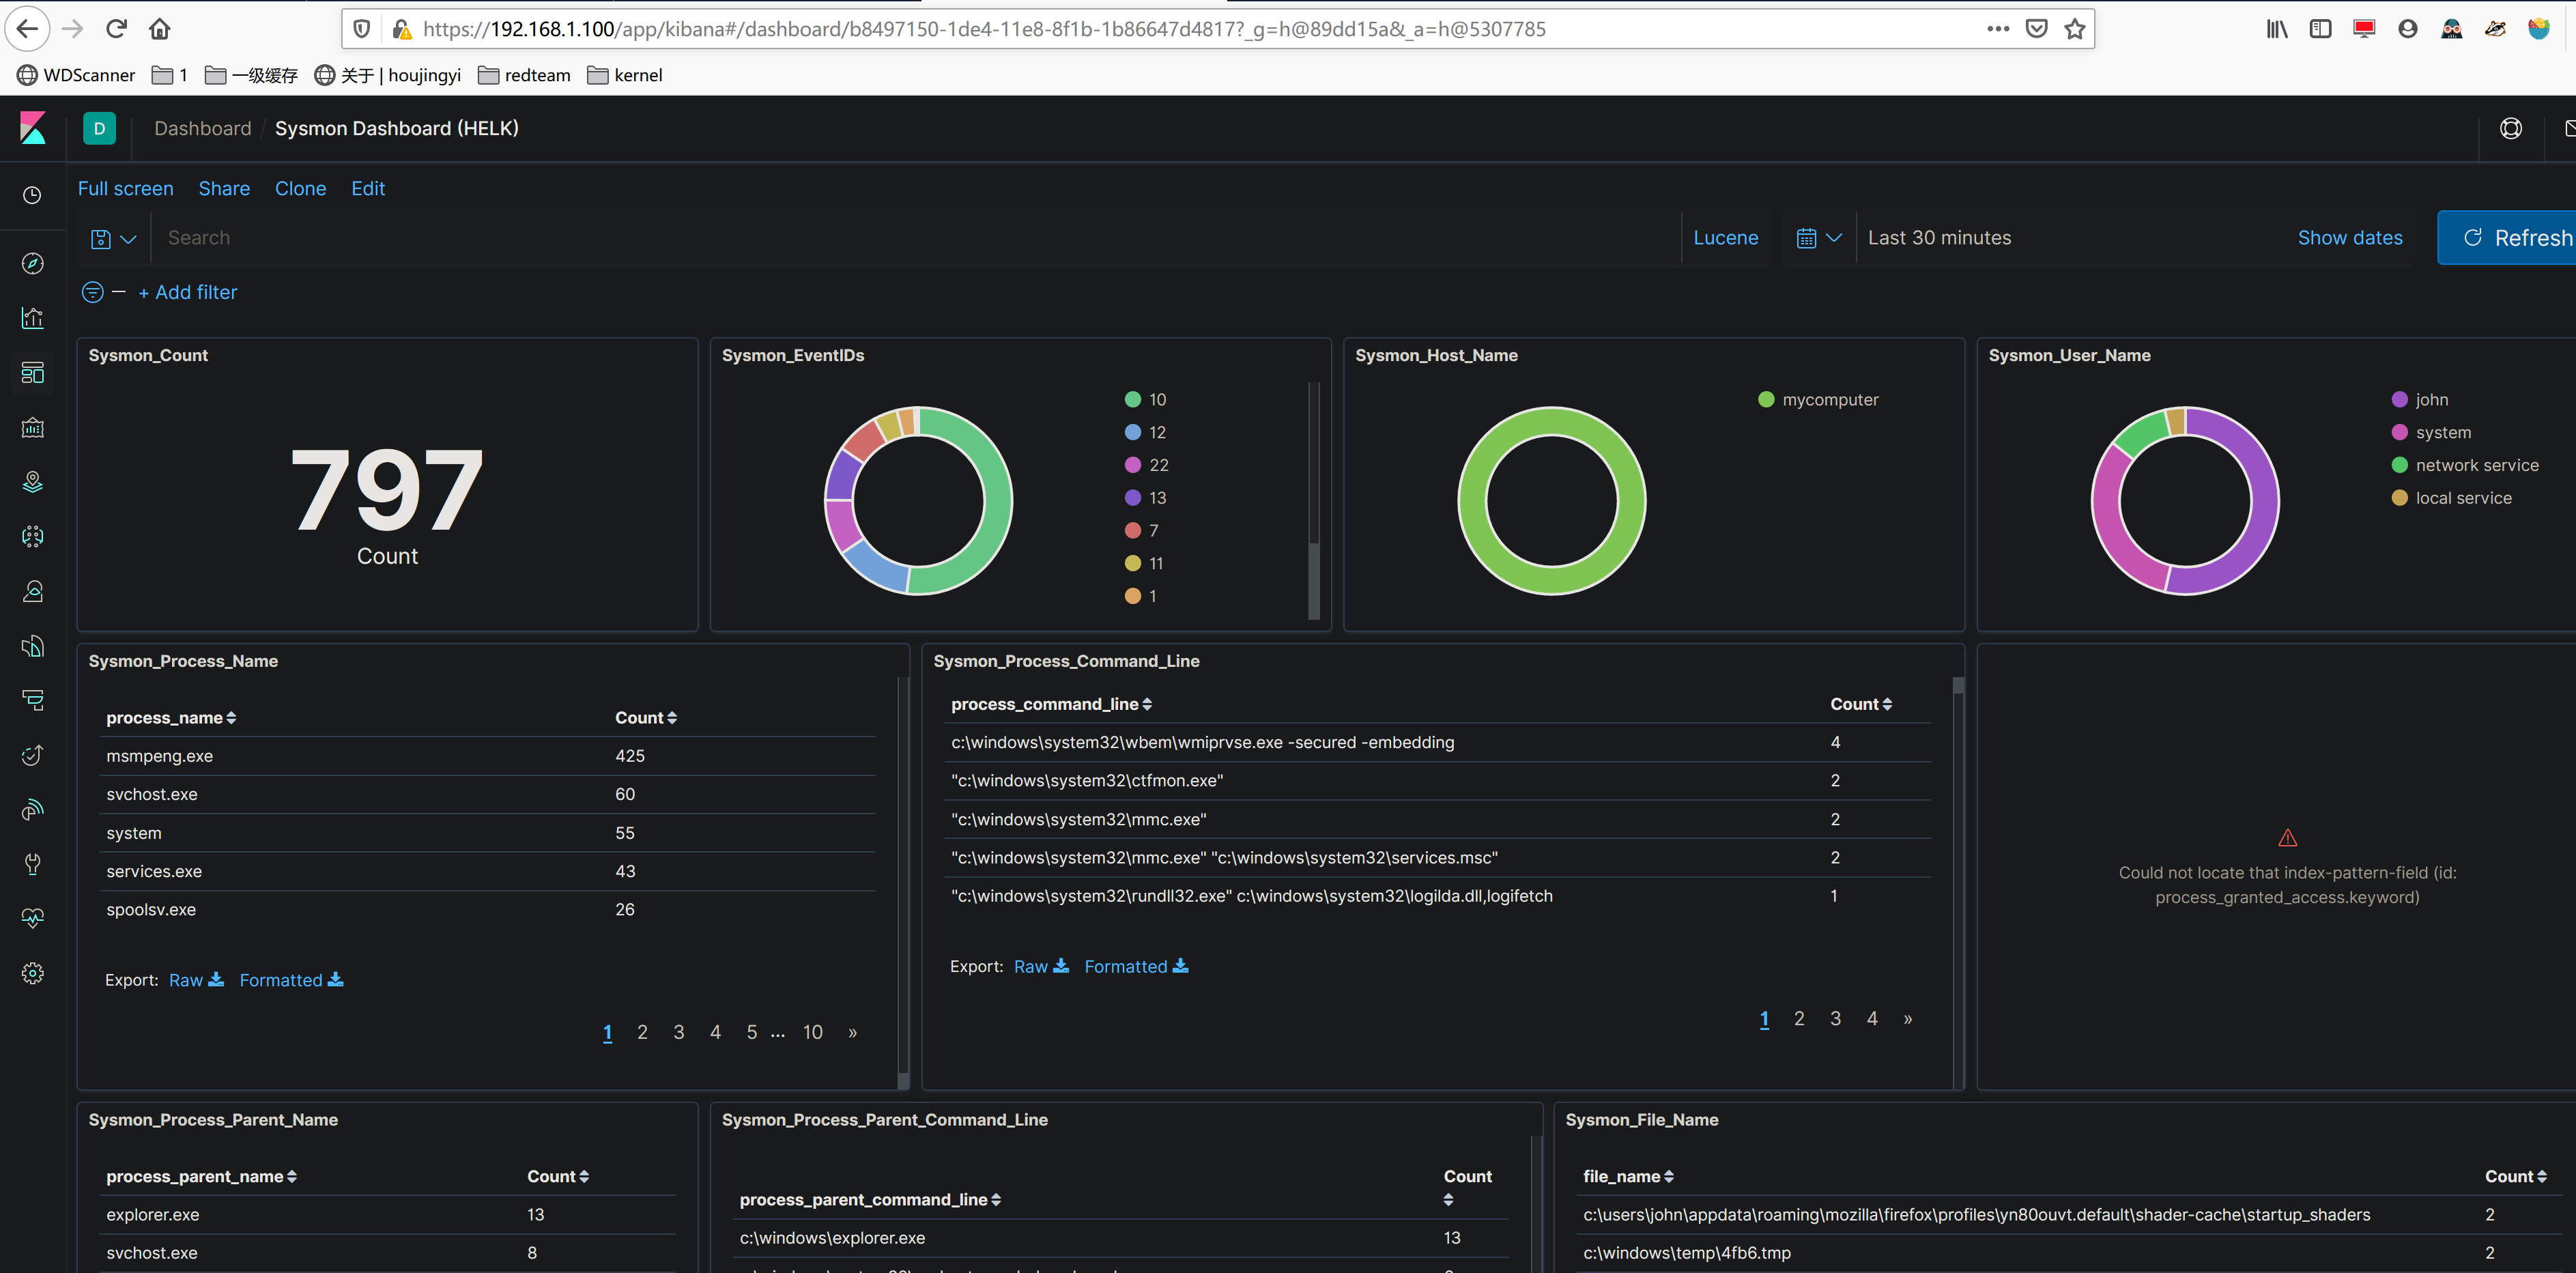
Kibana中进行查看
分别点击dashboard,sysmon dashboard
可以看到日志已经成功记录
引用
https://www.youtube.com/watch?v=C2cgvpN44is&t=463s
